Itamaeを使ったLAMP環境の構築
前回の記事「windowsにvagrantとvirtualboxでWeb開発環境をつくろう。(その4)手作業でLAMP環境構築」では、windows10のパソコンに、vagrant と Virtualbox を使って、CentOS7.5 を起動した状態で、apache2.4/PHP7.1/MySQL5.7 をインストールしてLAMP環境を構築する方法を説明しました。
今回は、Itamaeという環境構築ツールを使って、自動でLAMP環境を作る手順を説明します。
vagrant と VirtualBox (と仮想マシンにSSHするための Git for Windows) をインストールした状態から、一気にCentOS7/apache2.4/PHP7.1/MySQL5.7 のLAMP環境を自動で構築する手順を説明します。
記事「windowsにvagrantとvirtualboxでWeb開発環境をつくろう。(その3)LAMP環境構築の概略」にLAMP環境導入の作業の概略を書いてますが、Itamae を使って順番に自動で実行させます。
自動化したvagrantとItamaeの設定ファイル一式
とりあえず設定一式をツール置き場 に置きますので、展開して、vagrant の仮想マシン管理フォルダとして使ってみてください。
展開すると、以下のフォルダ・ファイル構成となってます。lsコマンドでの表示です。
|
1 2 3 4 5 6 7 8 9 10 11 12 13 14 15 16 17 18 19 20 21 22 23 24 25 26 27 |
user@cf-nx2 MINGW64 /c/data/tk/vagrant/autotest $ ls -1R .: html/ itamae/ Vagrantfile ./html: test/ vagrant/ ./html/test: index.php ./html/vagrant: index.php ./itamae: apache.rb config/ mysql.rb other.rb php.rb recipe.rb ./itamae/config: vhost.conf |
図で示すと下の通りです。
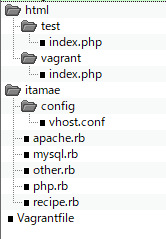
Vagrantfileのあるフォルダを仮想マシン管理フォルダとして、 vagrant up とコマンド入力すると、初回にプロビジョニングを行って、自動でCentOS7.5/apache2.4/mysql5.7/PHP7.1の環境を構築します。
ですが、使う前に、各ファイルの説明をしていきますね。
各ファイルの説明
autotest.zipで構築する仮想マシンは、記事「windowsにvagrantとvirtualboxでWeb開発環境をつくろう。(その4)手作業でLAMP環境構築」で手作業で構築したLAMP環境とほぼ同じです。
違いはというと、Itamaeという自動環境構築ツールをインストールしていることと、Itamaeを動かすために、ruby2.3をインストールしていることぐらいです。
では、Vagrantファイルから説明していきます。
Vagrantfile
まず、Vagrantfileですが、 vagrant init したときにできるコメントを削ってます。
|
1 2 3 4 5 6 7 8 9 10 11 12 13 14 15 16 17 18 19 20 21 22 23 24 25 26 27 28 29 30 31 32 33 34 35 36 37 38 39 40 41 42 43 44 45 46 47 48 49 50 |
Vagrant.configure("2") do |config| #ベースとなるボックス vagrant init により自動生成 config.vm.box = "bento/centos-7.5" #仮想マシンのIPアドレス設定 コメントアウト(#を外して有効にした) config.vm.network "private_network", ip: "192.168.33.10" #仮想マシンで実行するプロビジョニング(インストールなど環境構築) #config.vm.provision "shell", path: "install.sh" config.vm.provision "shell", inline: <<-SHELL # echo "rubyのために、rh sclリポジトリを追加" sudo yum install -y centos-release-scl # echo "ruby2.3をインストール" sudo yum install -y rh-ruby23 echo "ruby2.3のパスを通す設定追加。" if grep 'rh-ruby23/enable' /etc/bashrc > /dev/null; then echo 'すでに/etc/bashrcに追加済み' else echo "パス設定を/etc/bashrcに追加" echo 'source /opt/rh/rh-ruby23/enable' >> /etc/bashrc source ~/.bashrc fi echo "historyに日時を記録する設定追加" if grep 'HISTTIMEFORMAT' /etc/bashrc > /dev/null; then echo 'すでに設定済み' else echo 'history設定を /etc/bashrcに追加' echo "export HISTTIMEFORMAT='%F %T '" >> /etc/bashrc fi # echo "itamaeのインストール" gem install itamae echo "itamaeでインストールの続行" # --dry-run でお試し実行 # log-level: debug, info, warn, error, fatal, unknown itamae local --log-level=info /vagrant/itamae/recipe.rb SHELL end |
プロビジョニングコード
|
1 |
config.vm.provision "shell", inline: <<-SHELL |
から、
|
1 |
SHELL |
で囲まれた間のコードは、プロビジョニング コードとして、初めて vagrant up したときと、 vagrant provision コマンドを入力したときに実行されます。実行は仮想マシン上で行われます。
この中で、自動設定を行うコードを書いていきます。
rubyインストールコード
手動設定ではなかったところなので、ちょっと詳しく説明します。
まず、
|
1 |
sudo yum install -y centos-release-scl |
で、scl レポジトリを追加してます。
次に、 sudo yum install -y rh-ruby23 でrubyのバージョン2.3をインストールしてます。
そのあとの、
|
1 2 3 4 5 6 7 |
if grep 'rh-ruby23/enable' /etc/bashrc > /dev/null; then echo 'すでに/etc/bashrcに追加済み' else echo "パス設定を/etc/bashrcに追加" echo 'source /opt/rh/rh-ruby23/enable' >> /etc/bashrc source ~/.bashrc fi |
の部分は、インストールしたrubyが使えるように実行ファイルのパスを追加しているところです。
if文で条件分岐してます。もし、 grep 'rh-ruby23/enable' /etc/bashrc > /dev/null; という条件が成立したら すぐ下の echo コマンドを実行。この部分は、「すでに /etc/bashrc というファイルの中に rh-ruby23/enable という文字列があったら」という条件です。つまり「もうパスを設定してあったら」という意味になります。
echo 'すでに/etc/bashrcに追加済み' コマンドは、print文と同じで指定した文字列を画面に表示しているだけです。
else から fi で囲まれた部分は、if文で「そうでなかったら」実行されるコマンドたちです。
つまり、「パスが追加されてなかったら」実行される部分です。
echo 'source /opt/rh/rh-ruby23/enable' >> /etc/bashrc は、「’source ・・・・・’ という文字列を /etc/bashrc というファイルの末尾に書き足せ」というコマンドです。末尾に追加されます。
source というのは、「設定ファイルを読み込んで有効にする」の意味です。
bashrcというのは、bashというシェルの初期設定ファイルです。とくに/etcフォルダにあるのは、全ユーザで共通部分の初期設定ファイルとなります。
次のコマンド source ~/.bashrc は、「~/.bashrc というbashシェルの設定ファイルを読み込んで有効にする」という意味です。
~ というフォルダは、カレント(現在の)ユーザのホームディレクトリという意味です。.bashrc は、各ユーザごとのbashシェルの初期設定ファイルです。
つまり、 /etc/bashrc ファイルを書き換えたので、シェルの設定を読み直そうということです。これによって、追加したrubyのパスの設定が有効になります。
コマンド履歴への日時追加設定
手作業での追加の時と内容は同じになってますが、プロビジョニングをやるごとに追加しないように、先ほどと同様にif文と grep コマンド で HISTTIMEFORMAT という文字列が追加済みかどうかをチェックしています。
if grep 'HISTTIMEFORMAT' /etc/bashrc > /dev/null; then は、「すでに HISTTIMEFORMAT の文字列が /etc/bashrcファイルの中にあれば」という条件文です。TRUE(成立)であれば、画面表示のみ。FALSE(不成立)であれば、 else の後が設定を追加している部分です。
echo "export HISTTIMEFORMAT='%F %T '" >> /etc/bashrc で、/etc/bashrcファイルの末尾にexport文を追記しています。
itamaeのインストール
gem install itamaeで、itamaeをインストールしています。 gem はrubyのパッケージ管理ツールのコマンドです。
インストール後は、itamaeを使って自動構築を続けていきます。
itamae local --log-level=info /vagrant/itamae/recipe.rb コマンドでitamaeを実行してます。引数として、/vagrant/itamae/recipe.rb ファイルを指定します。
/vagrant は仮想マシン側から見た共有フォルダとなってます。
以下、recipe.rb の内容を見ていきましょう。
Itamaeでの自動構築内容 recipe.rb
ここからは、Itamaeを使った構築内容になります。
Vagrantでは、シェルコマンドを使うしかなかったのですが、Itamaeではそのほかにも便利なコマンドがあり、もうちょっと抽象的に指示することができ楽できます。例えば、CentOSのバージョン 6 と 7 でコマンドが違う場合も、同じ表現で済ますことができたりします。
下のリストが itamaeフォルダ内のrecipe.rbファイルです。
ここからは、手作業でインストールしたのと同じ内容を行っていってますが、Itamae のコマンドの説明を中心に行っていきます。
|
1 2 3 4 5 6 7 8 9 10 11 12 13 14 15 16 17 18 19 20 21 22 23 24 25 26 27 28 29 30 |
execute 'locale' do user "root" command <<-EOL # 言語設定 localectl set-locale LANG=ja_JP.UTF-8 EOL end execute 'timezone' do user "root" command <<-EOL # タイムゾーン設定 timedatectl set-timezone Asia/Tokyo timedatectl set-local-rtc no EOL end # 各レシピ実行 include_recipe "./other.rb" include_recipe "./apache.rb" include_recipe "./php.rb" include_recipe "./mysql.rb" #Apache起動、有効化 service 'httpd' do #action [:start, :enable] action [:restart, :enable] end |
言語設定
言語設定している部分を抜き出します。
|
1 2 3 4 5 6 7 |
execute 'locale' do user "root" command <<-EOL # 言語設定 localectl set-locale LANG=ja_JP.UTF-8 EOL end |
execute は、シェルコマンドを実行するブロックです。(ブロックは、doからendまでです。)
executeの直後の’locale’ 部分は、名称です。自由につけてOKです。
userは、実行するユーザ名、この場合、管理者(root)で実行します。
command は実行するコマンドです。<<-EOL と EOL で囲まれた行が順番に実行されます。
実行されるコマンド、
|
1 |
localectl set-locale LANG=ja_JP.UTF-8 |
は手作業と全く同じですが、ユーザ指定を別途行っているのでsudoは不要です。
タイムゾーンを東京に設定
下リストが対象のコードです。言語設定と同じくexecuteブロックを使用しています。
|
1 2 3 4 5 6 7 8 |
execute 'timezone' do user "root" command <<-EOL # タイムゾーン設定 timedatectl set-timezone Asia/Tokyo timedatectl set-local-rtc no EOL end |
別ファイルの読み出し・実行
vimなどの別ソフトインストール、apache、php、mysql のインストールはそれぞれ別のレシピ(設定)ファイルに記述してます。
ここで順番に読みだして実行してます。
|
1 2 3 4 5 |
# 各レシピ実行 include_recipe "./other.rb" include_recipe "./apache.rb" include_recipe "./php.rb" include_recipe "./mysql.rb" |
Apacheのデーモン(再)起動・自動起動設定
最後に、apacheの起動を行っています。php、mysql などのインストールが終わった後に起動する必要があるため、一番最後に記述しています。
|
1 2 3 4 5 |
#Apache起動、有効化 service 'httpd' do #action [:start, :enable] action [:restart, :enable] end |
apacheのデーモンの名前は httpd です。
ここは、CentOS6とCentOS7で、サービス起動のコマンド、OS起動時にサービス起動するためのコマンドが違うのですが、Itamae では、serviceブロックのaction で指定することにより、サービスの起動や停止、自動起動登録を行うことができます。
以下、別ファイルに分けていた部分の自動構築内容について説明します。
Itamaeでの自動構築 other.rb
その他ツールのインストールをしているレシピ(自動構築の設定)です。
|
1 2 3 4 5 6 7 8 |
# その他インストール %w(git vim man man-pages-ja).each do |pkg| package pkg do action :install end end |
最初の行
|
1 |
%w(git vim man man-pages-ja).each do |pkg| |
は、rubyのeachブロックで、()内の各項目について、順番に do ~ end までのブロック内を実行します。
各項目は pkg 変数に代入されています。
で、 pkg を引数として、Itamaeの package ブロックが実行されています。
属性として、 action :install としているので、各パッケージがインストールされます。
ここでは、git、vim、man、man-pages-ja の4つのパッケージをインストールしています。
Itamaeでの自動構築 apache.rb
apacheをインストールしています。
|
1 2 3 4 5 6 7 8 9 10 11 12 |
# Apacheインストール package 'httpd' do action :install end # バーチャルホストの設定 remote_file "/etc/httpd/conf.d/vhost.conf" do action :create source "config/vhost.conf" end |
パッケージインストール
最初の
|
1 2 3 |
package 'httpd' do action :install end |
の部分は、other.rb の each ブロック内と全く同じで、パッケージ httpd をインストールしています。
バーチャルホストの設定
|
1 2 3 4 5 |
# バーチャルホストの設定 remote_file "/etc/httpd/conf.d/vhost.conf" do action :create source "config/vhost.conf" end |
この部分は、remote_file ブロックで、ファイルを転送しています。
引数がターゲットとなるファイル、ここでは、 /etc/httpd/conf.d/vhost.conf としています。
source で、コピー元のファイルを指定します。このファイルからの相対パスで指定しています。
action :create というのは、ファイル作成の意味ですが、デフォルトになっているため記述を省略しても問題ありません。
で、vhost.conf の内容は下リストの通りです。
http://vagrant.lhost/、http://test.lhost/ でアクセスされたときと、その他(IPアドレスやほかのホスト.ドメイン名)でアクセスされたときの3通り設定しています。
|
1 2 3 4 5 6 7 8 9 10 11 12 13 14 15 16 17 18 19 20 21 22 23 24 25 26 27 28 29 30 31 32 |
#↓は廃止の方向 2.4ではいらないが、2.2では必要 NameVirtualHost *:80 #↓はワーニング抑制のためのダミーのサーバー名 ServerName defaulthost <Directory "/vagrant/html"> Options FollowSymLinks Includes ExecCGI AllowOverride All Require all granted </Directory> <VirtualHost *:80> ServerName defaulthost #デフォルトのままにするため DocumentRoot は指定しません ErrorLog "logs/default-error.log" CustomLog "logs/default-access.log" common </VirtualHost> <VirtualHost *:80> ServerName vagrant.lhost DocumentRoot "/vagrant/html/vagrant" ErrorLog "logs/vagrant-error.log" CustomLog "logs/vagrant-access.log" common </VirtualHost> <VirtualHost *:80> ServerName test.lhost DocumentRoot "/vagrant/html/test" ErrorLog "logs/test-error.log" CustomLog "logs/test-access.log" common </VirtualHost> |
Itamaeでの自動構築 php.rb
下のリストになります。
|
1 2 3 4 5 6 7 8 9 10 11 12 13 14 15 16 17 18 19 20 21 22 23 24 25 26 27 28 29 30 31 32 33 34 35 36 37 38 39 40 41 42 43 44 45 46 47 48 49 50 51 |
# PHPのインストール # EPELリポジトリの追加 execute 'repo1' do user "root" command "yum -y install epel-release" not_if "ls -l /etc/yum.repos.d/ | grep epel.repo" end # Remiリポジトリの追加 execute 'repo2' do user "root" command "yum -y install http://rpms.famillecollet.com/enterprise/remi-release-7.rpm" not_if "ls -l /etc/yum.repos.d/ | grep remi.repo" end # PHPインストール %w(php php-gd php-intl php-json php-mysqlnd php-mbstring).each do |pkg| package pkg do action :install options "--enablerepo=remi-php71" end end #管理ツール phpMyAdminインストール package 'phpMyAdmin' do action :install options "--enablerepo=remi-php71" end #phpMyAdminのアクセス権限緩和 #バックアップ execute 'phpMyAdmin.conf backup' do command 'cp /etc/httpd/conf.d/phpMyAdmin.conf /etc/httpd/conf.d/phpMyAdmin.conf.bu' not_if 'test -f /etc/httpd/conf.d/phpMyAdmin.conf.bu' end #変更 file '/etc/httpd/conf.d/phpMyAdmin.conf' do action :edit block do |content| content.gsub!("Require ip 127.0.0.1", "Require ip 127.0.0.1\n Require ip 192.168.") content.gsub!("Allow from 127.0.0.1", "Allow from 127.0.0.1\n Allow from 192.168.") end not_if "grep 'Require ip 192.168.' /etc/httpd/conf.d/phpMyAdmin.conf" end |
リポジトリの追加
まず、リポジトリを追加しています。
下リストのように、execute ブロックでコマンド実行していますが、 not_if 文がついているところが違います。
|
1 2 3 4 5 6 |
# EPELリポジトリの追加 execute 'repo1' do user "root" command "yum -y install epel-release" not_if "ls -l /etc/yum.repos.d/ | grep epel.repo" end |
これは、not_if の引数のコマンドの実行結果がFALSE(不成立)の時だけ、command を実行するという意味になります。ここでは、「/etc/yum.repos.d フォルダの中に、epel.repo というファイルがなければ、コマンドを実行する(レポジトリを追加する)」という意味になります。
|
1 2 3 4 5 6 |
# Remiリポジトリの追加 execute 'repo2' do user "root" command "yum -y install http://rpms.famillecollet.com/enterprise/remi-release-7.rpm" not_if "ls -l /etc/yum.repos.d/ | grep remi.repo" end |
上のレポジトリ追加と全く同じロジックです。yumコマンドの対象が httpから始まるURLで指定しているところが違うところです。
PHPパッケージインストール
|
1 2 3 4 5 6 7 8 |
# PHPインストール %w(php php-gd php-intl php-json php-mysqlnd php-mbstring).each do |pkg| package pkg do action :install options "--enablerepo=remi-php71" end end |
other.rb でもありましたが、each ブロックで複数のパッケージを連続してインストールしています。
php、php-gd、php-intl、php-json、php-mysqlnd、php-mbstringの各パッケージをインストールしています。
PHP7.1をインストールするために、 options "--enablerepo=remi-php71" と、options アトリビュート(属性)で、レポジトリを指定しています。
phpMyAdminパッケージインストール
|
1 2 3 4 5 |
#管理ツール phpMyAdminインストール package 'phpMyAdmin' do action :install options "--enablerepo=remi-php71" end |
PHPのインストールと全く同様に、MySQLのWebからの管理ツール phpMyAdmin をインストールしています。
phpMyAdminのアクセス制限緩和の設定
このままだと、サーバー内からしかアクセスできなく不便なため、ホストOSからはアクセスできるように、アクセス制限を緩和する設定を行います。
まず、修正するファイル /etc/httpd/conf.d/phpMyAdmin.conf のバックアップを取っています。 /etc/httpd/conf.d/phpMyAdmin.conf.bu ファイルがないときだけ、つまり、一回だけバックアップファイル作っています。
|
1 2 3 4 5 |
#バックアップ execute 'phpMyAdmin.conf backup' do command 'cp /etc/httpd/conf.d/phpMyAdmin.conf /etc/httpd/conf.d/phpMyAdmin.conf.bu' not_if 'test -f /etc/httpd/conf.d/phpMyAdmin.conf.bu' end |
次に、file ブロックで ファイルを編集しています。
action に :edit を選択し、block ブロックで ファイル内容を修正しています。
content は ファイルの内容 を示します。
gsub は置換で ! を付けると「破壊的変更」ということで、元ファイルが変更されます。
|
1 2 3 4 5 6 7 8 9 |
#変更 file '/etc/httpd/conf.d/phpMyAdmin.conf' do action :edit block do |content| content.gsub!("Require ip 127.0.0.1", "Require ip 127.0.0.1\n Require ip 192.168.") content.gsub!("Allow from 127.0.0.1", "Allow from 127.0.0.1\n Allow from 192.168.") end not_if "grep 'Require ip 192.168.' /etc/httpd/conf.d/phpMyAdmin.conf" end |
たとえば、
|
1 |
content.gsub!("Require ip 127.0.0.1", "Require ip 127.0.0.1\n Require ip 192.168.") |
では、「Require ip 127.0.0.1」という行を探してきて、「Require ip 192.168. 」という行を下に追加しています。Vagrantfile で、仮想マシンのIPアドレスを192.168.33.10 と指定しているため、ホストOSは192.168.x.x (xは任意)となっているので、ホストOSからもアクセスすることができるようになります。
Allow という文言でも同様に修正してます。apache は 2.2系 と 2.4系 で設定内容が違うため、Require と Allow と両方で設定しています。
また、
|
1 |
not_if "grep 'Require ip 192.168.' /etc/httpd/conf.d/phpMyAdmin.conf" |
と、not_if 文をつけることで、すでに追加されていたら、再度追記しないようにしています。
Itamaeでの自動構築 mysql.rb
下のリストです。
|
1 2 3 4 5 6 7 8 9 10 11 12 13 14 15 16 17 18 19 20 21 22 23 24 25 26 27 28 29 30 31 32 33 34 35 36 37 38 39 40 41 42 43 44 45 46 47 48 49 50 51 52 53 54 55 56 57 58 59 60 61 62 63 64 65 66 67 68 69 70 71 72 |
# MySQLのインストール # mysqlのリポジトリ追加 execute 'repositry' do user "root" command <<-EOL yum -y install http://dev.mysql.com/get/mysql57-community-release-el7-11.noarch.rpm EOL not_if "ls -l /etc/yum.repos.d/ | grep mysql-community.repo" end # インストール %w(mysql-community-server).each do |pkg| package pkg do action :install options "--enablerepo=mysql57-community" end end #my.cnf backup execute 'my.cnf backup' do command 'cp /etc/my.cnf /etc/my.cnf.bu' not_if 'test -f /etc/my.cnf.bu' end #ファイルmy.cnfへ追加設定 mycnf_setting = <<"EOL" #言語設定追加 [mysqld] character-set-server=utf8mb4 collation_server=utf8mb4_bin [client] default-character-set=utf8mb4 [mysqldump] default-character-set=utf8mb4 EOL file '/etc/my.cnf' do action :edit block do |content| #設定が追加済みかのチェック if not content =~ /default-character-set/ then content << mycnf_setting end end end # 起動。自動起動は設定済みのため必要なし service 'mysqld' do action :restart end # 初期パスワードの変更 execute 'change initial password' do user "root" command <<-EOL mysqladmin -u root -p`grep "temporary password" /var/log/mysqld.log | awk '{printf $NF}'` password 12345aA! EOL not_if "mysql -u root -p12345aA! -e 'show databases;'" end |
リポジトリの追加
|
1 2 3 4 5 6 7 8 |
# mysqlのリポジトリ追加 execute 'repositry' do user "root" command <<-EOL yum -y install http://dev.mysql.com/get/mysql57-community-release-el7-11.noarch.rpm EOL not_if "ls -l /etc/yum.repos.d/ | grep mysql-community.repo" end |
PHPインストール用のリポジトリ追加と同様の内容です。
コマンドでyumコマンドでインストールしている点、not_if でリポジトリがまだインストールされていないときだけ実行する点が同じです。
パッケージインストール
パッケージブロックでインストールしています。 options "--enablerepo=mysql57-community" と、リポジトリを指定するオプションを指定してます。
結局1パッケージだけだったので、eachブロックはいらなくなったのですが、下リストでは、1つの要素だけで、eachブロックを使用しています ^^;
|
1 2 3 4 5 6 7 8 |
# インストール %w(mysql-community-server).each do |pkg| package pkg do action :install options "--enablerepo=mysql57-community" end end |
設定ファイルのバックアップ
設定ファイル /etc/my.cnf を修正するため、バックアップしています。
not_if文で、バックアップファイルがないときだけ、つまり1回だけバックアップファイルを作成してます。
|
1 2 3 4 5 |
#my.cnf backup execute 'my.cnf backup' do command 'cp /etc/my.cnf /etc/my.cnf.bu' not_if 'test -f /etc/my.cnf.bu' end |
言語設定の追加
まず、変数 mycnf_setting に、追加する文字列を代入してます。
<<"EOL" から EOL までが対象の文字列になります。
|
1 2 3 4 5 6 7 8 9 10 11 12 13 14 15 16 |
#ファイルmy.cnfへ追加設定 mycnf_setting = <<"EOL" #言語設定追加 [mysqld] character-set-server=utf8mb4 collation_server=utf8mb4_bin [client] default-character-set=utf8mb4 [mysqldump] default-character-set=utf8mb4 EOL |
fileブロックでファイルの編集をします。
今回も block ブロックを使用していますが、gsub という置換は使ってません。
|
1 2 3 4 5 6 7 8 9 |
file '/etc/my.cnf' do action :edit block do |content| #設定が追加済みかのチェック if not content =~ /default-character-set/ then content << mycnf_setting end end end |
if not content =~ /default-character-set/ then というIF文で、content(ファイル内)に「default-character-set」という文字列がないときだけ追加するようにしてます。
if文の内部 content << mycnf_setting で変数 mycnf_setting の内容を、ファイル内容 content の最後尾に追記しています。
サービスの(再)起動
serviceブロックで、サービスの(再)起動をします。mysql はインストール時に自動起動の登録がされているので、action に enable は設定していません。
|
1 2 3 4 |
# 起動。自動起動は設定済みのため必要なし service 'mysqld' do action :restart end |
初期パスワードの変更
厄介なことに、mysql5.7 では、初期パスワードは勝手に設定されて、変更しないとアクセスが制限されてしまいます。
初期パスワードは、/var/log/mysqld.log というログファイルに 「temporary pasword」というキーワードとともに記録されています。
変更にはexecuteブロックでシェルコマンド実行という形で行ってます。
|
1 2 3 4 5 6 7 8 |
# 初期パスワードの変更 execute 'change initial password' do user "root" command <<-EOL mysqladmin -u root -p`grep "temporary password" /var/log/mysqld.log | awk '{printf $NF}'` password 12345aA! EOL not_if "mysql -u root -p12345aA! -e 'show databases;'" end |
変更後のパスワードは仮に 12345aA! としています。運用するなら変更してください。デフォルト設定でパスワードに制約が設けられており、8文字以上、数字、英字の大文字、小文字、記号を入れることになっていますので、変更するときに注意してください。
何度provisionを実行してもパスワードの変更は1回だけ行うようにするため、 not_if 文で12345aA!でログインできるかをチェックしています。
パスワードを変更している文は、
|
1 |
mysqladmin -u root -p`grep "temporary password" /var/log/mysqld.log | awk '{printf $NF}'` password 12345aA! |
と、ちょっと複雑になっているため説明します。
シェルのなかで、`(バッククオート) で囲まれた部分は実行されて結果文字列に変換されます。
例えば、 `date` とすると、date を実行した後の「2019年 2月 9日 土曜日 17:36:13 JST」という文字列に変換されます。
‘(シングルクオート)とは全然意味が違うのでご注意ください。
さて、それを踏まえて、上のコマンドの、バッククオートの部分に注目します。
|
1 |
`grep "temporary password" /var/log/mysqld.log | awk '{printf $NF}'` |
このぶぶんは、grepコマンドで、/var/log/mysqld.log ファイルの中の 「temporary password」という文字列を検索して、該当する一文を返答します。|(パイプ)でawk に渡されていますが、awkはプログラム言語のひとつで、文字列の処理を簡単な記述で行うことができます。
AWKの説明
awk に文字列が渡されると、awkは一行単位で処理します。特に指定をしなければ、スペース(空白)文字によって文字列が分けられます。この分けたものをフィールドと言います。
NFというのはその行のフィールドの数を示す変数になってます。
そして、printf $数字 というコマンドは、数字番目のフィールドを表示する命令となってます。$1 であれば、1番目、$3であれば3番目のフィールドの文字列です。
例えば、grepコマンドでは、次の一行がawkに渡されます。
|
1 |
2019-01-03T07:19:32.837164Z 1 [Note] A temporary password is generated for root@localhost: VIj4=.fYuxxx |
上の文字列がawkに渡されると、まず、スペース文字でフィールドに分けられますので、例えば awk {printf $3} とやると、3番目のフィールドの [Note] が出力されます。NFという変数にはフィールドの数が入っているため、 awk {printf $NF} では、最後のフィールドが表示されます。
なので、
|
1 |
2019-01-03T07:19:32.837164Z 1 [Note] A temporary password is generated for root@localhost: VIj4=.fYuxxx |
が渡されたときは、root の初期パスワード VIj4=.fYuxxx が表示されるんです。
シェルコマンドのバッククオートの箇所にこのパスワードを代入すると、
|
1 |
mysqladmin -u root -p`grep "temporary password" /var/log/mysqld.log | awk '{printf $NF}'` password 12345aA! |
は、
|
1 |
mysqladmin -u root -pVIj4=.fYuxxx password 12345aA! |
となり、 mysqladmin コマンドを ユーザ名=root、パスワード=初期パスワードで実行し、パスワードを 12345aA! に変更しています。
htmlファイル
これらは、バーチャルホストの動作確認のためのブラウザでアクセスする用のファイルとなります。
http://test.lhost/ アクセス用
phpコードにより、$_SERVER 変数に入っている連想配列の中を表示させています。
いろいろとサーバーの情報が垂れ流しになるので、公開サーバーで公開しないように注意してくださいね。
|
1 2 3 4 5 6 7 8 9 10 11 12 13 14 15 16 17 |
<!DOCTYPE html> <html lang="ja"> <head> <title>自動構築 テストページ</title> </head> <body> <h1>自動構築 完了!</h1> <p>環境変数一覧:</p> <?php print "<pre>\n"; foreach ($_SERVER as $key => $val) { print $key . ":" . $val . "<br>\n"; } ?> </body> </html> |
http://vagrant.lhost/ アクセス用
こっちは、公開しても害はありません。
表示されるたびに、サーバー側で 1~100の間の乱数を発生させ、結果を表示するテストページとなってます。1,2が出た時は、大当たりとして表示内容を変えてます。
|
1 2 3 4 5 6 7 8 9 10 11 12 13 14 15 16 17 18 19 20 21 22 23 24 25 26 27 28 29 30 31 |
<?php $min = 1; $max = 100; $idx = mt_rand($min, $max); ?> <!DOCTYPE html> <html lang="ja"> <head> <title>自動構築 完了テストページ<?php echo $idx; ?></title> </head> <body> <?php switch ($idx) { case 1: echo "<h1>大当たり!!! 1がでたよ!!!</h1>"; break; case 2: echo "<h2>大当たり! 2等がでたよ</h2>"; break; default: echo "<h3>1~100の抽選の結果、$idx がでました。</h3>"; break; } ?> </body> </html> |
動作確認結果
説明したファイル一式で実際に自動構築した結果を載せておきます。
自動構築のログ
いったん、仮想マシンを削除して、再度作ってみました。10分ぐらいで構築できています。
ログを載せます。
|
1 2 3 4 5 6 7 8 9 10 11 12 13 14 15 16 17 18 19 20 21 22 23 24 25 26 27 28 29 30 31 32 33 34 35 36 37 38 39 40 41 42 43 44 45 46 47 48 49 50 51 52 53 54 55 56 57 58 59 60 61 62 63 64 65 66 67 68 69 70 71 72 73 74 75 76 77 78 79 80 81 82 83 84 85 86 87 88 89 90 91 92 93 94 95 96 97 98 99 100 101 102 103 104 105 106 107 108 109 110 111 112 113 114 115 116 117 118 119 120 121 122 123 124 125 126 127 128 129 130 131 132 133 134 135 136 137 138 139 140 141 142 143 144 145 146 147 148 149 150 151 152 153 154 155 156 157 158 159 160 161 162 163 164 165 166 167 168 169 170 171 172 173 174 175 176 177 178 179 180 181 182 183 184 185 186 187 188 189 190 191 192 193 194 195 196 197 198 199 200 201 202 203 204 205 206 207 208 209 210 211 212 213 214 215 216 217 218 219 220 221 222 223 224 225 226 227 228 229 230 231 232 233 234 235 236 237 238 239 240 241 242 243 244 245 246 247 248 249 250 251 252 253 254 255 256 257 258 259 260 261 262 263 264 265 266 267 268 269 270 271 272 273 274 275 276 277 278 279 280 281 282 283 284 285 286 287 288 289 290 291 292 293 294 295 296 297 298 299 300 301 302 303 304 305 306 307 308 309 310 311 312 313 314 315 316 317 318 319 320 321 322 323 324 325 326 327 328 329 330 331 332 333 334 335 336 337 338 339 340 341 342 343 344 345 346 347 348 349 350 351 352 353 354 355 356 357 358 359 360 361 362 363 364 365 366 367 368 369 370 371 372 373 374 375 376 377 378 379 380 381 382 383 384 385 386 387 388 389 390 391 392 393 394 395 396 397 398 399 400 401 402 403 404 405 406 407 408 409 410 411 412 413 414 415 416 417 418 419 420 421 422 423 424 425 426 427 428 429 430 431 432 433 434 435 436 437 438 439 440 441 442 443 444 445 446 447 448 |
user@cf-nx2 MINGW64 /c/data/tk/vagrant/autotest $ vagrant destroy default: Are you sure you want to destroy the 'default' VM? [y/N] y ==> default: Forcing shutdown of VM... ==> default: Destroying VM and associated drives... user@cf-nx2 MINGW64 /c/data/tk/vagrant/autotest $ vagrant status Current machine states: default not created (virtualbox) The environment has not yet been created. Run `vagrant up` to create the environment. If a machine is not created, only the default provider will be shown. So if a provider is not listed, then the machine is not created for that environment. user@cf-nx2 MINGW64 /c/data/tk/vagrant/autotest $ date 2019年 2月 9日 土曜日 18:43:44 user@cf-nx2 MINGW64 /c/data/tk/vagrant/autotest $ vagrant up Bringing machine 'default' up with 'virtualbox' provider... ==> default: Importing base box 'bento/centos-7.5'... ==> default: Matching MAC address for NAT networking... ==> default: Checking if box 'bento/centos-7.5' version '201808.24.0' is up to date... ==> default: Setting the name of the VM: autotest_default_1549705449821_52935 ==> default: Clearing any previously set network interfaces... ==> default: Preparing network interfaces based on configuration... default: Adapter 1: nat default: Adapter 2: hostonly ==> default: Forwarding ports... default: 22 (guest) => 2222 (host) (adapter 1) ==> default: Booting VM... ==> default: Waiting for machine to boot. This may take a few minutes... default: SSH address: 127.0.0.1:2222 default: SSH username: vagrant default: SSH auth method: private key default: Warning: Connection reset. Retrying... default: Warning: Connection aborted. Retrying... default: Warning: Remote connection disconnect. Retrying... default: Warning: Connection aborted. Retrying... default: Warning: Remote connection disconnect. Retrying... default: Warning: Connection reset. Retrying... default: Warning: Connection aborted. Retrying... default: Warning: Remote connection disconnect. Retrying... default: default: Vagrant insecure key detected. Vagrant will automatically replace default: this with a newly generated keypair for better security. default: default: Inserting generated public key within guest... default: Removing insecure key from the guest if it's present... default: Key inserted! Disconnecting and reconnecting using new SSH key... ==> default: Machine booted and ready! ==> default: Checking for guest additions in VM... default: The guest additions on this VM do not match the installed version of default: VirtualBox! In most cases this is fine, but in rare cases it can default: prevent things such as shared folders from working properly. If you see default: shared folder errors, please make sure the guest additions within the default: virtual machine match the version of VirtualBox you have installed on default: your host and reload your VM. default: default: Guest Additions Version: 5.2.18 default: VirtualBox Version: 6.0 ==> default: Configuring and enabling network interfaces... ==> default: Mounting shared folders... default: /vagrant => C:/data/tk/vagrant/autotest ==> default: Running provisioner: shell... default: Running: inline script default: Loaded plugins: fastestmirror default: Determining fastest mirrors default: * base: ftp.jaist.ac.jp default: * extras: ftp.jaist.ac.jp default: * updates: ftp.jaist.ac.jp default: Resolving Dependencies default: --> Running transaction check default: ---> Package centos-release-scl.noarch 0:2-2.el7.centos will be installed default: --> Processing Dependency: centos-release-scl-rh for package: centos-release-scl-2-2.el7.centos.noarch default: --> Running transaction check default: ---> Package centos-release-scl-rh.noarch 0:2-2.el7.centos will be installed default: --> Finished Dependency Resolution default: default: Dependencies Resolved default: default: ================================================================================ default: Package Arch Version Repository Size default: ================================================================================ default: Installing: default: centos-release-scl noarch 2-2.el7.centos extras 12 k default: Installing for dependencies: default: centos-release-scl-rh noarch 2-2.el7.centos extras 12 k default: default: Transaction Summary default: ================================================================================ default: Install 1 Package (+1 Dependent package) default: default: Total download size: 24 k default: Installed size: 39 k default: Downloading packages: default: -------------------------------------------------------------------------------- default: Total 14 kB/s | 24 kB 00:01 default: Running transaction check default: Running transaction test default: Transaction test succeeded default: Running transaction default: Installing : centos-release-scl-rh-2-2.el7.centos.noarch 1/2 default: default: Installing : centos-release-scl-2-2.el7.centos.noarch 2/2 default: default: Verifying : centos-release-scl-rh-2-2.el7.centos.noarch 1/2 default: default: Verifying : centos-release-scl-2-2.el7.centos.noarch 2/2 default: default: default: Installed: default: centos-release-scl.noarch 0:2-2.el7.centos default: default: Dependency Installed: default: centos-release-scl-rh.noarch 0:2-2.el7.centos default: default: Complete! default: Loaded plugins: fastestmirror default: Loading mirror speeds from cached hostfile default: * base: ftp.jaist.ac.jp default: * extras: ftp.jaist.ac.jp default: * updates: ftp.jaist.ac.jp default: Resolving Dependencies default: --> Running transaction check default: ---> Package rh-ruby23.x86_64 0:2.2-7.el7 will be installed default: --> Processing Dependency: rh-ruby23-runtime for package: rh-ruby23-2.2-7.el7.x86_64 default: --> Processing Dependency: rh-ruby23-ruby for package: rh-ruby23-2.2-7.el7.x86_64 default: --> Running transaction check default: ---> Package rh-ruby23-ruby.x86_64 0:2.3.8-69.sc1.el7 will be installed default: --> Processing Dependency: rh-ruby23-ruby-libs(x86-64) = 2.3.8-69.sc1.el7 for package: rh-ruby23-ruby-2.3.8-69.sc1.el7.x86_64 default: --> Processing Dependency: rh-ruby23-rubygem(did_you_mean) >= 1.0.0 for package: rh-ruby23-ruby-2.3.8-69.sc1.el7.x86_64 default: --> Processing Dependency: rh-ruby23-rubygem(bigdecimal) >= 1.2.8 for package: rh-ruby23-ruby-2.3.8-69.sc1.el7.x86_64 default: --> Processing Dependency: rh-ruby23-ruby(rubygems) >= 2.5.2.3 for package: rh-ruby23-ruby-2.3.8-69.sc1.el7.x86_64 default: --> Processing Dependency: libruby.so.2.3()(64bit) for package: rh-ruby23-ruby-2.3.8-69.sc1.el7.x86_64 default: ---> Package rh-ruby23-runtime.x86_64 0:2.2-7.el7 will be installed default: --> Processing Dependency: scl-utils for package: rh-ruby23-runtime-2.2-7.el7.x86_64 default: --> Running transaction check default: ---> Package rh-ruby23-ruby-libs.x86_64 0:2.3.8-69.sc1.el7 will be installed default: ---> Package rh-ruby23-rubygem-bigdecimal.x86_64 0:1.2.8-69.sc1.el7 will be installed default: ---> Package rh-ruby23-rubygem-did_you_mean.x86_64 0:1.0.0-69.sc1.el7 will be installed default: ---> Package rh-ruby23-rubygems.noarch 0:2.5.2.3-69.sc1.el7 will be installed default: --> Processing Dependency: rh-ruby23-rubygem(rdoc) >= 4.2.1 for package: rh-ruby23-rubygems-2.5.2.3-69.sc1.el7.noarch default: --> Processing Dependency: rh-ruby23-rubygem(psych) >= 2.1.0.1 for package: rh-ruby23-rubygems-2.5.2.3-69.sc1.el7.noarch default: --> Processing Dependency: rh-ruby23-rubygem(io-console) >= 0.4.5 for package: rh-ruby23-rubygems-2.5.2.3-69.sc1.el7.noarch default: ---> Package scl-utils.x86_64 0:20130529-19.el7 will be installed default: --> Running transaction check default: ---> Package rh-ruby23-rubygem-io-console.x86_64 0:0.4.5-69.sc1.el7 will be installed default: ---> Package rh-ruby23-rubygem-psych.x86_64 0:2.1.0.1-69.sc1.el7 will be installed default: --> Processing Dependency: libyaml-0.so.2()(64bit) for package: rh-ruby23-rubygem-psych-2.1.0.1-69.sc1.el7.x86_64 default: ---> Package rh-ruby23-rubygem-rdoc.noarch 0:4.2.1-69.sc1.el7 will be installed default: --> Processing Dependency: rh-ruby23-ruby(irb) = 2.3.8 for package: rh-ruby23-rubygem-rdoc-4.2.1-69.sc1.el7.noarch default: --> Processing Dependency: rh-ruby23-rubygem(json) >= 1.8.3.1 for package: rh-ruby23-rubygem-rdoc-4.2.1-69.sc1.el7.noarch default: --> Running transaction check default: ---> Package libyaml.x86_64 0:0.1.4-11.el7_0 will be installed default: ---> Package rh-ruby23-ruby-irb.noarch 0:2.3.8-69.sc1.el7 will be installed default: ---> Package rh-ruby23-rubygem-json.x86_64 0:1.8.3.1-69.sc1.el7 will be installed default: --> Finished Dependency Resolution default: default: Dependencies Resolved default: default: ================================================================================ default: Package Arch Version Repository Size default: ================================================================================ default: Installing: default: rh-ruby23 x86_64 2.2-7.el7 centos-sclo-rh 2.9 k default: Installing for dependencies: default: libyaml x86_64 0.1.4-11.el7_0 base 55 k default: rh-ruby23-ruby x86_64 2.3.8-69.sc1.el7 centos-sclo-rh 74 k default: rh-ruby23-ruby-irb noarch 2.3.8-69.sc1.el7 centos-sclo-rh 93 k default: rh-ruby23-ruby-libs x86_64 2.3.8-69.sc1.el7 centos-sclo-rh 2.9 M default: rh-ruby23-rubygem-bigdecimal x86_64 1.2.8-69.sc1.el7 centos-sclo-rh 86 k default: rh-ruby23-rubygem-did_you_mean x86_64 1.0.0-69.sc1.el7 centos-sclo-rh 218 k default: rh-ruby23-rubygem-io-console x86_64 0.4.5-69.sc1.el7 centos-sclo-rh 56 k default: rh-ruby23-rubygem-json x86_64 1.8.3.1-69.sc1.el7 centos-sclo-rh 81 k default: rh-ruby23-rubygem-psych x86_64 2.1.0.1-69.sc1.el7 centos-sclo-rh 86 k default: rh-ruby23-rubygem-rdoc noarch 4.2.1-69.sc1.el7 centos-sclo-rh 483 k default: rh-ruby23-rubygems noarch 2.5.2.3-69.sc1.el7 centos-sclo-rh 285 k default: rh-ruby23-runtime x86_64 2.2-7.el7 centos-sclo-rh 25 k default: scl-utils x86_64 20130529-19.el7 base 24 k default: default: Transaction Summary default: ================================================================================ default: Install 1 Package (+13 Dependent packages) default: default: Total download size: 4.4 M default: Installed size: 14 M default: Downloading packages: default: Public key for rh-ruby23-2.2-7.el7.x86_64.rpm is not installed default: warning: /var/cache/yum/x86_64/7/centos-sclo-rh/packages/rh-ruby23-2.2-7.el7.x86_64.rpm: Header V4 RSA/SHA1 Signature, key ID f2ee9d55: NOKEY default: -------------------------------------------------------------------------------- default: Total 511 kB/s | 4.4 MB 00:08 default: Retrieving key from file:///etc/pki/rpm-gpg/RPM-GPG-KEY-CentOS-SIG-SCLo default: Importing GPG key 0xF2EE9D55: default: Userid : "CentOS SoftwareCollections SIG (https://wiki.centos.org/SpecialInterestGroup/SCLo) <security@centos.org>" default: Fingerprint: c4db d535 b1fb ba14 f8ba 64a8 4eb8 4e71 f2ee 9d55 default: Package : centos-release-scl-rh-2-2.el7.centos.noarch (@extras) default: From : /etc/pki/rpm-gpg/RPM-GPG-KEY-CentOS-SIG-SCLo default: Running transaction check default: Running transaction test default: Transaction test succeeded default: Running transaction default: Installing : scl-utils-20130529-19.el7.x86_64 1/14 default: default: Installing : rh-ruby23-runtime-2.2-7.el7.x86_64 2/14 default: default: Installing : rh-ruby23-ruby-libs-2.3.8-69.sc1.el7.x86_64 3/14 default: default: Installing : libyaml-0.1.4-11.el7_0.x86_64 4/14 default: default: Installing : rh-ruby23-rubygem-io-console-0.4.5-69.sc1.el7.x86_64 5/14 default: default: Installing : rh-ruby23-rubygem-json-1.8.3.1-69.sc1.el7.x86_64 6/14 default: default: Installing : rh-ruby23-rubygem-did_you_mean-1.0.0-69.sc1.el7.x86_64 7/14 default: default: Installing : rh-ruby23-rubygem-rdoc-4.2.1-69.sc1.el7.noarch 8/14 default: default: Installing : rh-ruby23-ruby-irb-2.3.8-69.sc1.el7.noarch 9/14 default: default: Installing : rh-ruby23-ruby-2.3.8-69.sc1.el7.x86_64 10/14 default: default: Installing : rh-ruby23-rubygem-bigdecimal-1.2.8-69.sc1.el7.x86_64 11/14 default: default: Installing : rh-ruby23-rubygems-2.5.2.3-69.sc1.el7.noarch 12/14 default: default: Installing : rh-ruby23-rubygem-psych-2.1.0.1-69.sc1.el7.x86_64 13/14 default: default: Installing : rh-ruby23-2.2-7.el7.x86_64 14/14 default: default: Verifying : libyaml-0.1.4-11.el7_0.x86_64 1/14 default: default: Verifying : rh-ruby23-rubygem-rdoc-4.2.1-69.sc1.el7.noarch 2/14 default: default: Verifying : rh-ruby23-rubygem-psych-2.1.0.1-69.sc1.el7.x86_64 3/14 default: default: Verifying : rh-ruby23-runtime-2.2-7.el7.x86_64 4/14 default: default: Verifying : scl-utils-20130529-19.el7.x86_64 5/14 default: default: Verifying : rh-ruby23-rubygem-io-console-0.4.5-69.sc1.el7.x86_64 6/14 default: default: Verifying : rh-ruby23-2.2-7.el7.x86_64 7/14 default: default: Verifying : rh-ruby23-rubygem-json-1.8.3.1-69.sc1.el7.x86_64 8/14 default: default: Verifying : rh-ruby23-rubygems-2.5.2.3-69.sc1.el7.noarch 9/14 default: default: Verifying : rh-ruby23-ruby-irb-2.3.8-69.sc1.el7.noarch 10/14 default: default: Verifying : rh-ruby23-rubygem-did_you_mean-1.0.0-69.sc1.el7.x86_64 11/14 default: default: Verifying : rh-ruby23-ruby-libs-2.3.8-69.sc1.el7.x86_64 12/14 default: default: Verifying : rh-ruby23-ruby-2.3.8-69.sc1.el7.x86_64 13/14 default: default: Verifying : rh-ruby23-rubygem-bigdecimal-1.2.8-69.sc1.el7.x86_64 14/14 default: default: default: Installed: default: rh-ruby23.x86_64 0:2.2-7.el7 default: default: Dependency Installed: default: libyaml.x86_64 0:0.1.4-11.el7_0 default: rh-ruby23-ruby.x86_64 0:2.3.8-69.sc1.el7 default: rh-ruby23-ruby-irb.noarch 0:2.3.8-69.sc1.el7 default: rh-ruby23-ruby-libs.x86_64 0:2.3.8-69.sc1.el7 default: rh-ruby23-rubygem-bigdecimal.x86_64 0:1.2.8-69.sc1.el7 default: rh-ruby23-rubygem-did_you_mean.x86_64 0:1.0.0-69.sc1.el7 default: rh-ruby23-rubygem-io-console.x86_64 0:0.4.5-69.sc1.el7 default: rh-ruby23-rubygem-json.x86_64 0:1.8.3.1-69.sc1.el7 default: rh-ruby23-rubygem-psych.x86_64 0:2.1.0.1-69.sc1.el7 default: rh-ruby23-rubygem-rdoc.noarch 0:4.2.1-69.sc1.el7 default: rh-ruby23-rubygems.noarch 0:2.5.2.3-69.sc1.el7 default: rh-ruby23-runtime.x86_64 0:2.2-7.el7 default: scl-utils.x86_64 0:20130529-19.el7 default: default: Complete! default: ruby2.3のパスを通す設定追加。 default: パス設定を/etc/bashrcに追加 default: historyに日時を記録する設定追加 default: history設定を /etc/bashrcに追加 default: Successfully installed thor-0.20.3 default: Successfully installed net-ssh-5.1.0 default: Successfully installed net-scp-1.2.1 default: Successfully installed net-telnet-0.1.1 default: Successfully installed sfl-2.3 default: Successfully installed specinfra-2.76.9 default: Successfully installed hashie-3.6.0 default: Successfully installed ansi-1.5.0 default: Successfully installed schash-0.1.2 default: Successfully installed itamae-1.10.3 default: Parsing documentation for thor-0.20.3 default: Installing ri documentation for thor-0.20.3 default: Parsing documentation for net-ssh-5.1.0 default: Installing ri documentation for net-ssh-5.1.0 default: Parsing documentation for net-scp-1.2.1 default: Installing ri documentation for net-scp-1.2.1 default: Parsing documentation for net-telnet-0.1.1 default: Installing ri documentation for net-telnet-0.1.1 default: Parsing documentation for sfl-2.3 default: Installing ri documentation for sfl-2.3 default: Parsing documentation for specinfra-2.76.9 default: Installing ri documentation for specinfra-2.76.9 default: Parsing documentation for hashie-3.6.0 default: Installing ri documentation for hashie-3.6.0 default: Parsing documentation for ansi-1.5.0 default: Installing ri documentation for ansi-1.5.0 default: Parsing documentation for schash-0.1.2 default: Installing ri documentation for schash-0.1.2 default: Parsing documentation for itamae-1.10.3 default: Installing ri documentation for itamae-1.10.3 default: Done installing documentation for thor, net-ssh, net-scp, net-telnet, sfl, specinfra, hashie, ansi, schash, itamae after 25 seconds default: 10 gems installed default: itamaeでインストールの続行 default: INFO : Starting Itamae... default: INFO : Recipe: /vagrant/itamae/recipe.rb default: INFO : execute[locale] executed will change from 'false' to 'true' default: INFO : execute[timezone] executed will change from 'false' to 'true' default: INFO : Recipe: /vagrant/itamae/other.rb default: INFO : package[git] installed will change from 'false' to 'true' default: INFO : package[vim] installed will change from 'false' to 'true' default: INFO : package[man] installed will change from 'false' to 'true' default: INFO : package[man-pages-ja] installed will change from 'false' to 'true' default: INFO : Recipe: /vagrant/itamae/apache.rb default: INFO : package[httpd] installed will change from 'false' to 'true' default: INFO : remote_file[/etc/httpd/conf.d/vhost.conf] exist will change from 'false' to 'true' default: INFO : remote_file[/etc/httpd/conf.d/vhost.conf] modified will change from 'false' to 'true' default: INFO : diff: default: INFO : --- /dev/null 2019-02-09 18:44:34.847000000 +0900 default: INFO : +++ /tmp/itamae_tmp/1549705637.0480306 2019-02-09 18:47:17.078860998 +0900 default: INFO : @@ -0,0 +1,34 @@ default: INFO : + default: INFO : +#↓は廃止の方向 2.4ではいらないが、2.2では必要 default: INFO : +NameVirtualHost *:80 default: INFO : + default: INFO : +#↓はワーニング抑制のためのダミーのサーバー名 default: INFO : +ServerName defaulthost default: INFO : + default: INFO : +<Directory "/vagrant/html"> default: INFO : + Options FollowSymLinks Includes ExecCGI default: INFO : + AllowOverride All default: INFO : + Require all granted default: INFO : +</Directory> default: INFO : + default: INFO : +<VirtualHost *:80> default: INFO : + ServerName defaulthost default: INFO : + #デフォルトのままにするため DocumentRoot は指定しません default: INFO : + ErrorLog "logs/default-error.log" default: INFO : + CustomLog "logs/default-access.log" common default: INFO : +</VirtualHost> default: INFO : + default: INFO : +<VirtualHost *:80> default: INFO : + ServerName vagrant.lhost default: INFO : + DocumentRoot "/vagrant/html/vagrant" default: INFO : + ErrorLog "logs/vagrant-error.log" default: INFO : + CustomLog "logs/vagrant-access.log" common default: INFO : +</VirtualHost> default: INFO : + default: INFO : +<VirtualHost *:80> default: INFO : + ServerName test.lhost default: INFO : + DocumentRoot "/vagrant/html/test" default: INFO : + ErrorLog "logs/test-error.log" default: INFO : + CustomLog "logs/test-access.log" common default: INFO : +</VirtualHost> default: INFO : + default: INFO : Recipe: /vagrant/itamae/php.rb default: INFO : execute[repo1] executed will change from 'false' to 'true' default: INFO : execute[repo2] executed will change from 'false' to 'true' default: INFO : package[php] installed will change from 'false' to 'true' default: INFO : package[php-gd] installed will change from 'false' to 'true' default: INFO : package[php-intl] installed will change from 'false' to 'true' default: INFO : package[php-mysqlnd] installed will change from 'false' to 'true' default: INFO : package[php-mbstring] installed will change from 'false' to 'true' default: INFO : package[phpMyAdmin] installed will change from 'false' to 'true' default: INFO : execute[phpMyAdmin.conf backup] executed will change from 'false' to 'true' default: INFO : file[/etc/httpd/conf.d/phpMyAdmin.conf] modified will change from 'false' to 'true' default: INFO : diff: default: INFO : --- /etc/httpd/conf.d/phpMyAdmin.conf 2018-05-27 03:24:16.000000000 +0900 default: INFO : +++ /tmp/itamae_tmp/1549705782.273387 2019-02-09 18:49:42.308343302 +0900 default: INFO : @@ -15,6 +15,7 @@ default: INFO : # Apache 2.4 default: INFO : <RequireAny> default: INFO : Require ip 127.0.0.1 default: INFO : + Require ip 192.168. default: INFO : Require ip ::1 default: INFO : </RequireAny> default: INFO : </IfModule> default: INFO : @@ -23,6 +24,7 @@ default: INFO : Order Deny,Allow default: INFO : Deny from All default: INFO : Allow from 127.0.0.1 default: INFO : + Allow from 192.168. default: INFO : Allow from ::1 default: INFO : </IfModule> default: INFO : </Directory> default: INFO : @@ -32,6 +34,7 @@ default: INFO : # Apache 2.4 default: INFO : <RequireAny> default: INFO : Require ip 127.0.0.1 default: INFO : + Require ip 192.168. default: INFO : Require ip ::1 default: INFO : </RequireAny> default: INFO : </IfModule> default: INFO : @@ -40,6 +43,7 @@ default: INFO : Order Deny,Allow default: INFO : Deny from All default: INFO : Allow from 127.0.0.1 default: INFO : + Allow from 192.168. default: INFO : Allow from ::1 default: INFO : </IfModule> default: INFO : </Directory> default: INFO : Recipe: /vagrant/itamae/mysql.rb default: INFO : execute[repositry] executed will change from 'false' to 'true' default: INFO : package[mysql-community-server] installed will change from 'false' to 'true' default: INFO : execute[my.cnf backup] executed will change from 'false' to 'true' default: INFO : file[/etc/my.cnf] modified will change from 'false' to 'true' default: INFO : diff: default: INFO : --- /etc/my.cnf 2018-12-21 20:16:52.000000000 +0900 default: INFO : +++ /tmp/itamae_tmp/1549705878.392473 2019-02-09 18:51:18.422022604 +0900 default: INFO : @@ -25,3 +25,15 @@ default: INFO : default: INFO : log-error=/var/log/mysqld.log default: INFO : pid-file=/var/run/mysqld/mysqld.pid default: INFO : + default: INFO : +#言語設定追加 default: INFO : +[mysqld] default: INFO : +character-set-server=utf8mb4 default: INFO : +collation_server=utf8mb4_bin default: INFO : + default: INFO : +[client] default: INFO : +default-character-set=utf8mb4 default: INFO : + default: INFO : +[mysqldump] default: INFO : +default-character-set=utf8mb4 default: INFO : + default: INFO : service[mysqld] running will change from 'false' to 'true' default: INFO : execute[change initial password] executed will change from 'false' to 'true' default: INFO : service[httpd] running will change from 'false' to 'true' default: INFO : service[httpd] enabled will change from 'false' to 'true' user@cf-nx2 MINGW64 /c/data/tk/vagrant/autotest $ date 2019年 2月 9日 土曜日 18:54:18 |
動作確認
ブラウザでのアクセス確認
phpMyAdmin
ホストOS(Windows10)のブラウザで http://192.168.33.10/phpMyAdmin でアクセスします。
root, 設定後の初期パスワード 12345aA! でアクセスしてみます。
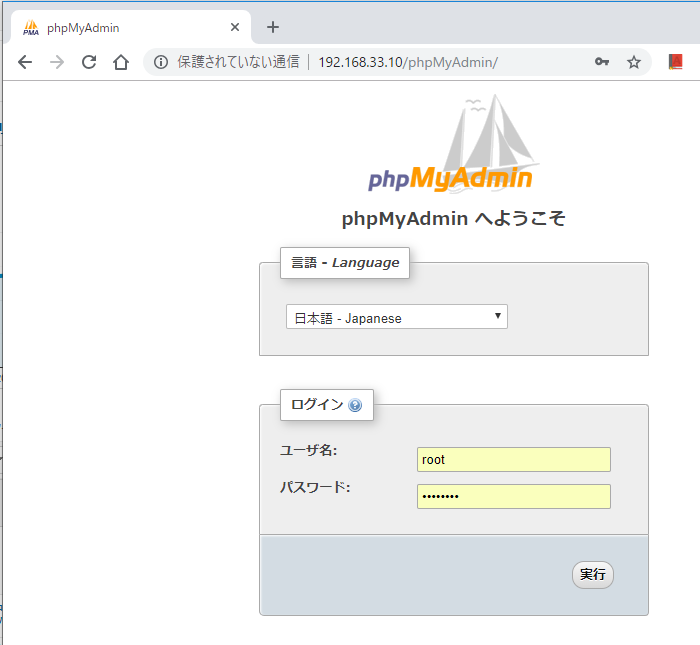
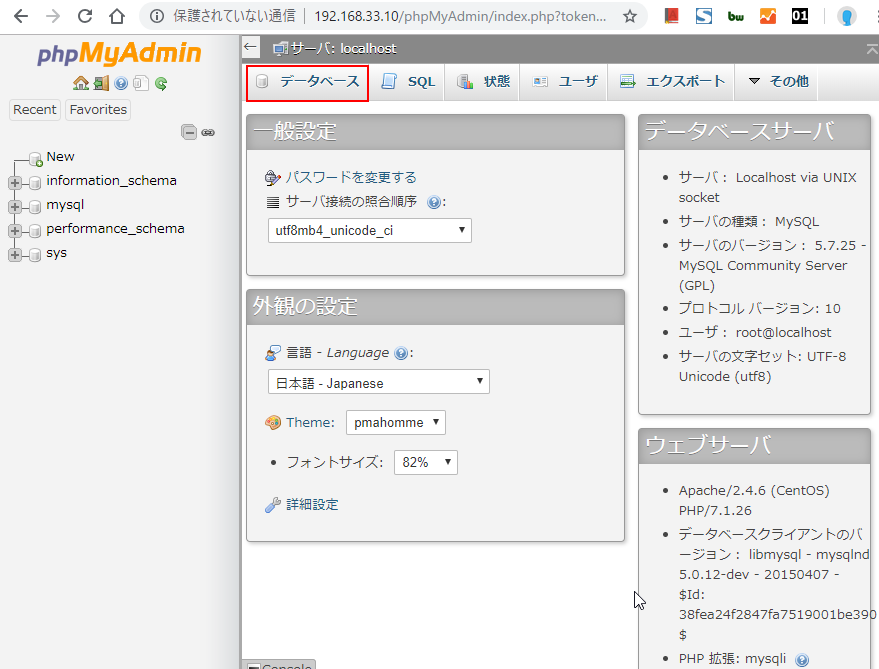
ログインして、「データベース」一覧を見てみましょう。
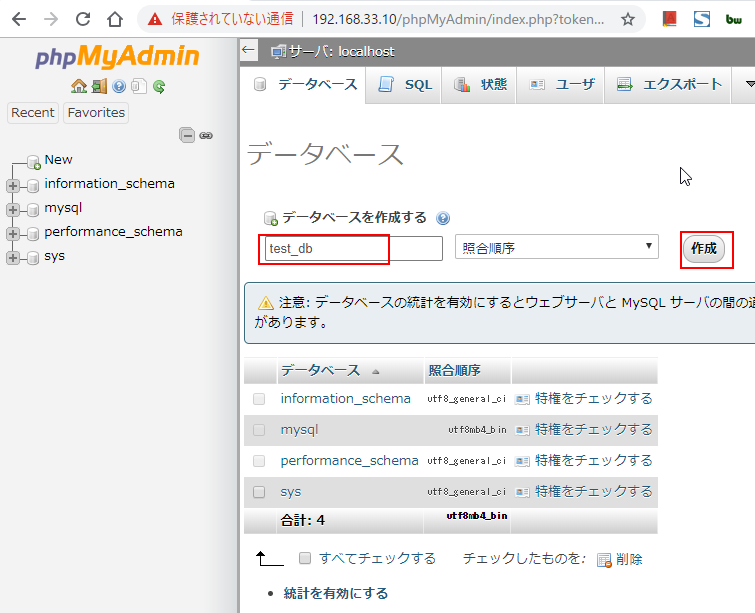
test_dbというデータベースを作成してみます。
test_dbと入力して「作成」ボタンをクリックします。
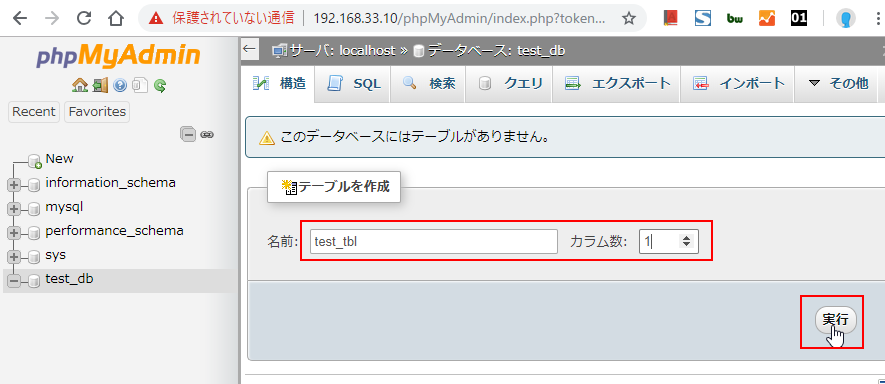
ついでにテーブルも作成しましょう。名前に「test_tbl」カラム数は1にして「実行」ボタンを押します。
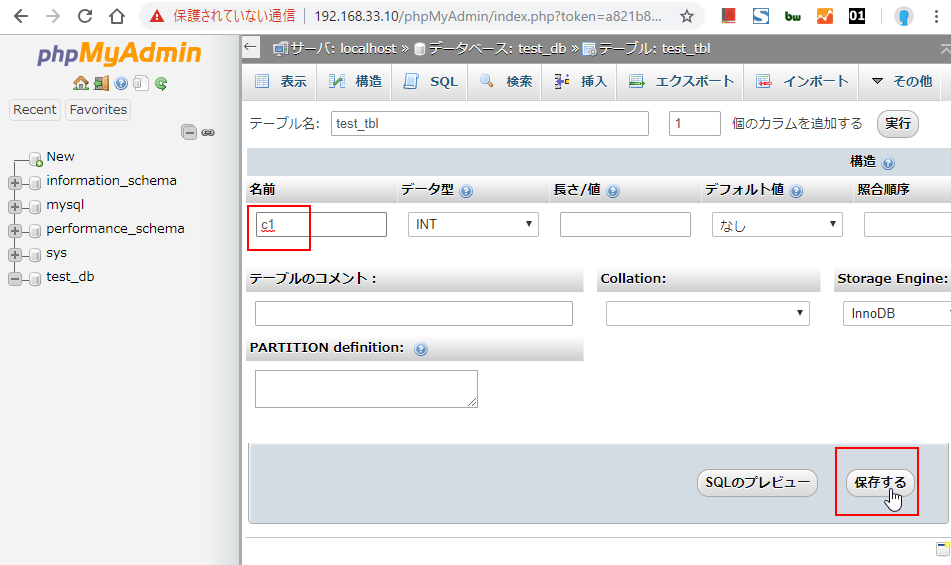
適当に、カラム名にc1 と入れて「保存する」をクリックします。
テーブルが作成できました。
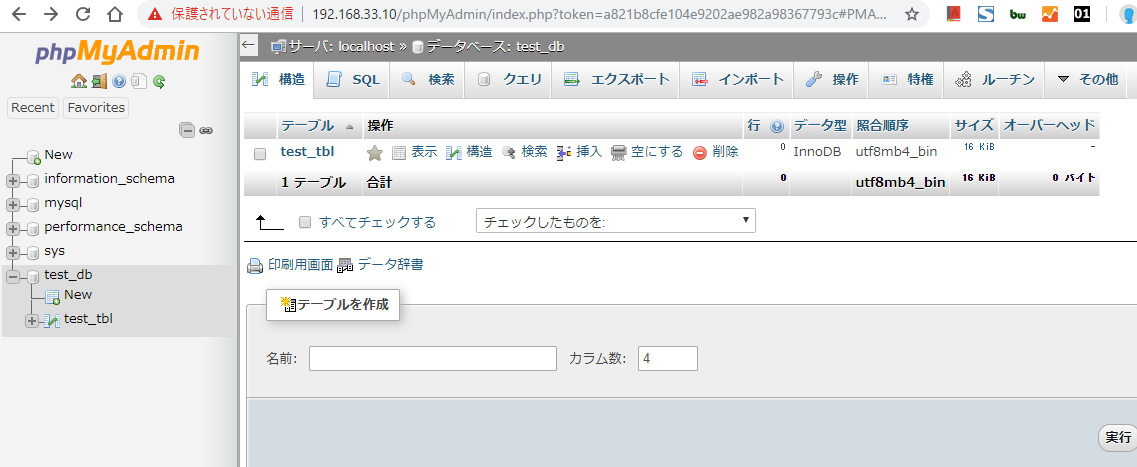
テーブルの照合順序が utf8mb4_bin になっていれば、とりあえず、apache、php、mysqlのインストールは全て問題ないでしょう。
データベースを消しておきます。
「サーバ:localhost」をクリックして、さらに「データベース」をクリックすると、データベース一覧が表示されます。
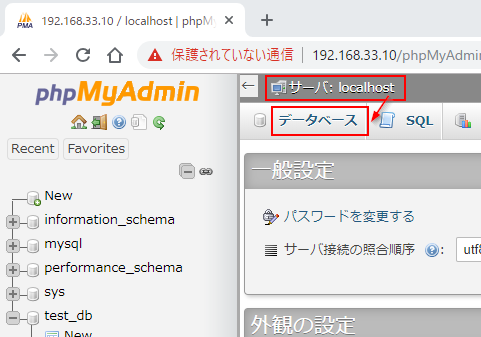
test_dbのチェックボックスにチェックを入れて、「削除」リンクをクリックしましょう。
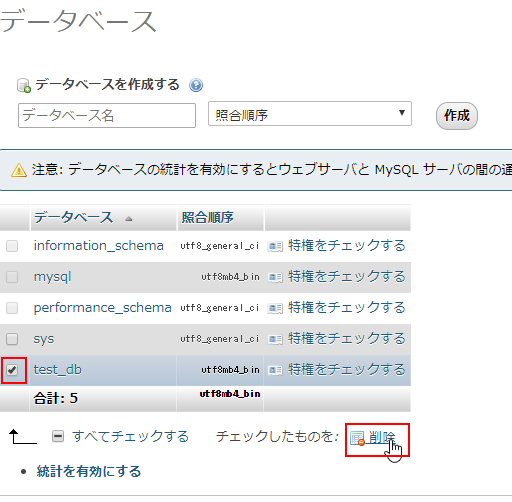
確認ウィンドウで「OK」で確定します。

デフォルトサーバ
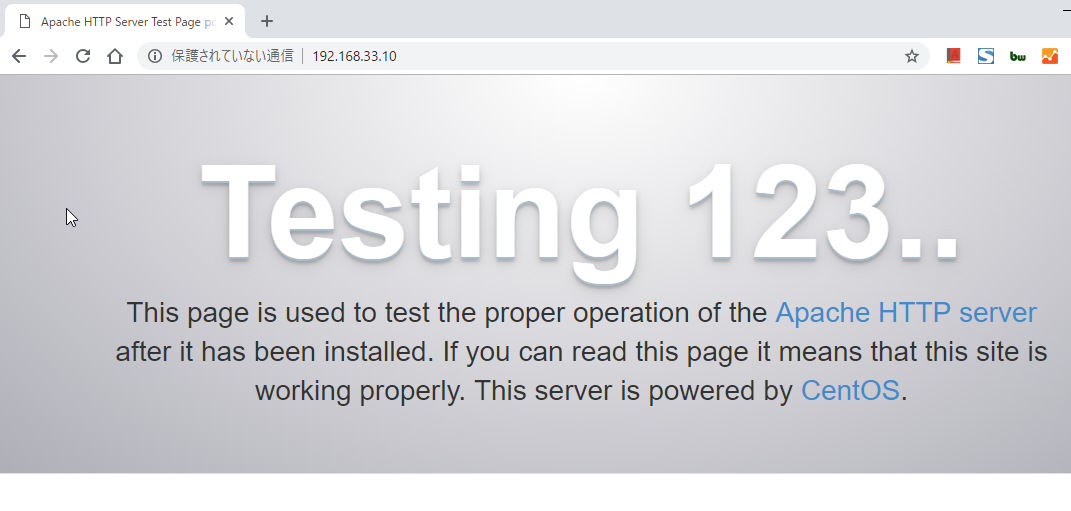
http://192.168.33.10/にアクセスします。
「Testing 123..」のページが表示されればデフォルトサーバーの表示はOKです。
test.lhost 表示
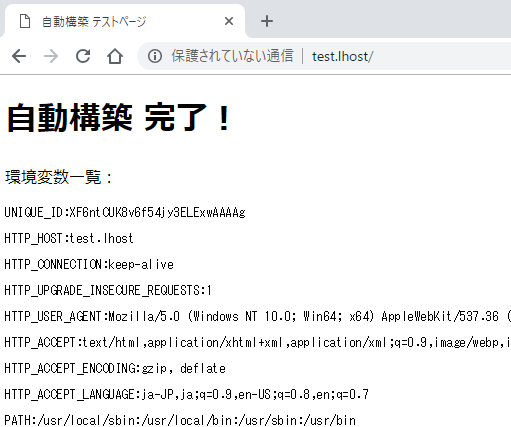
http://test.lhost/ にアクセスして下さい。
下図のように環境変数一覧が表示されれば、ちゃんと表示がホスト名によって切り替わってます。ホストOS(Windows10)の hosts ファイルが設定されていなかったら、サーバーが見つからないエラーになります。その時は、記事「windowsにvagrantとvirtualboxでWeb開発環境をつくろう。(その2)IPアドレスとホスト名の設定」のhostsファイルの設定をチェックしてみてください。
vagrant.lhost 表示
ここまでくれば、ブラウザ系はまず大丈夫ですが、vagrant.lhostの方も確認しておきましょう。
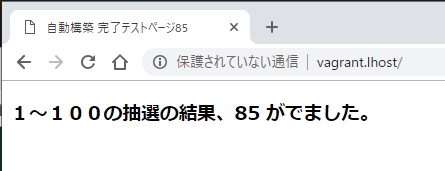
http://vagrant.lhost/ にアクセスして下さい。
下図の感じで、抽選結果が表示されればOKです。
SSHでのログインしてのテスト
sshでログインして、日本語表示とタイムゾーンの確認をしましょう。
|
1 |
ssh vagrant@192.168.33.10 |
とコマンド入力して、SSHでログインしましょう。
もし、下リストのように、 Host key verification failed. と出ている場合、同じIPアドレスで仮想マシンのキーが変わってしまってます。今回のように、vagrant destroyしてupするなど、仮想マシンを再構築しているとこういうことが起きます。
こういう時は、ホストマシン(windows10)に保存されているキーを削除してしまいましょう。SSHの接続先のコンピュータに変更がないはずなのに、こういうエラーが出た場合、偽物のコンピュータが成りすましている可能性がありますので、接続先の情報を得るなどして、接続先が安全か確認する様にしてください。
ここでは、Git bash 上で .ssh/known_hosts ファイルを編集して、192.168.33.10 の行を削除してます。
|
1 2 3 4 5 6 7 8 9 10 11 12 13 14 15 16 17 18 |
user@cf-nx2 MINGW64 /c/data/tk/vagrant/autotest $ ssh vagrant@192.168.33.10 @@@@@@@@@@@@@@@@@@@@@@@@@@@@@@@@@@@@@@@@@@@@@@@@@@@@@@@@@@@ @ WARNING: REMOTE HOST IDENTIFICATION HAS CHANGED! @ @@@@@@@@@@@@@@@@@@@@@@@@@@@@@@@@@@@@@@@@@@@@@@@@@@@@@@@@@@@ IT IS POSSIBLE THAT SOMEONE IS DOING SOMETHING NASTY! Someone could be eavesdropping on you right now (man-in-the-middle attack)! It is also possible that a host key has just been changed. The fingerprint for the RSA key sent by the remote host is SHA256:28RYo7YAYAnrfkhCMfo1Uf574VLIL+wcj8dXgtNZqWc. Please contact your system administrator. Add correct host key in /c/Users/user/.ssh/known_hosts to get rid of this message. Offending RSA key in /c/Users/user/.ssh/known_hosts:5 RSA host key for 192.168.33.10 has changed and you have requested strict checking. Host key verification failed. user@cf-nx2 MINGW64 /c/data/tk/vagrant/autotest $ vim ~/.ssh/known_hosts |
コマンドで削除することもできます。
ssh-keygen -R 192.168.33.10 と入力することで、ファイルからIPアドレス 192.168.33.10 のコンピュータのキー情報を削除することができます。
|
1 2 3 4 5 |
user@cf-nx2 MINGW64 /c/data/tk/vagrant/autotest $ ssh-keygen -R 192.168.33.10 # Host 192.168.33.10 found: line 5 /c/Users/user/.ssh/known_hosts updated. Original contents retained as /c/Users/user/.ssh/known_hosts.old |
さて、この状態で改めて ssh vagrant@192.168.33.10 とすると、ユーザvagrant で仮想マシンにログインすることができます。
初めての接続となりますので、「Are you sure you want to continue connecting?(継続するか)」と聞かれたら、「yes」+リターンキーで答えてください。
vagrant のパスワードは vagrant です。(ついでにrootのパスワードも)。
|
1 2 3 4 5 6 7 |
user@cf-nx2 MINGW64 /c/data/tk/vagrant/autotest $ ssh vagrant@192.168.33.10 The authenticity of host '192.168.33.10 (192.168.33.10)' can't be established. ECDSA key fingerprint is SHA256:Su0SZi4qDErdgrx9bkofW8h83EhpJgXlC2/Wqh1iXus. Are you sure you want to continue connecting (yes/no)? yes Warning: Permanently added '192.168.33.10' (ECDSA) to the list of known hosts. vagrant@192.168.33.10's password: |
ログインできたら、 date コマンドを入力しましょう。
下リストのように、日本語表示されていて、さらに「JST」と日本標準時になっていればOKです。
確認は以上でOKとなります。ログアウトして終了です。exit と入力するか、Ctrlキー+d でログアウトできます。
|
1 2 3 4 5 6 7 |
[vagrant@localhost ~]$ date 2019年 2月 9日 土曜日 19:19:00 JST [vagrant@localhost ~]$ ログアウト Connection to 192.168.33.10 closed. user@cf-nx2 MINGW64 /c/data/tk/vagrant/autotest $ |
まとめ
この記事では、Itamaeを使って CentOS7/Apache2.4/MySQL5.7/PHP7.1 を自動で構築するための方法を説明しました。
バージョンアップやレポジトリのURL変更など、この記事の通りでできないことも出てくるかもしれませんが、この記事に書いてある設定の理由を理解することができれば、自分で情報を得て、修正することが可能だと思います。
また、ほかにも環境を変更する際には、仮想マシンにログインして変更するだけでなく、その都度、Itamaeのファイルにも反映することにより、いつでも、環境を再構築することができます。
普段楽をするため、また、いざというとき、すぐに再構築できるためにも、ぜひ、自動構築にチャレンジしてみてください。
再構築は忘れたころにやってきますよ。
windowsにvagrantとvirtualboxでWeb開発環境をつくろう。(その1)仮想マシン作成まで
windowsにvagrantとvirtualboxでWeb開発環境をつくろう。(その2)IPアドレスとホスト名の設定
windowsにvagrantとvirtualboxでWeb開発環境をつくろう。(その3)LAMP環境構築の概略
windowsにvagrantとvirtualboxでWeb開発環境をつくろう。(その4)手作業でLAMP環境構築
windowsにvagrantとvirtualboxでWeb開発環境をつくろう。(その5)itamaeを使って自動でLAMP環境構築するには

コメント