vagrant(ベイグラントと呼びます)は、自分のローカルパソコン上に、いくつかのパソコンをエミュレートさせることができる便利なツールです。パソコン上に作る偽物のパソコンを仮想マシンとか、仮想環境とか言います。
vagrant 事態は管理ツールなので、実際の仮想パソコンは Virtualbox など別ツールを利用することになります。
vagrant を使った仮想環境の作り方を、記事「windowsにvagrantとvirtualboxでWeb開発環境をつくろう。(その1)仮想マシン作成まで」で紹介していますので興味があれば見てください。
この記事では、vagrantのコマンドをまとめておきます。大雑把に以下の分類で説明します。
- 仮想マシン管理(仮想マシン管理フォルダ上で実行するコマンド)
- 仮想マシン管理(どのフォルダでも実行できるコマンド)
- Box(仮想マシンのベースイメージ)を管理するコマンド
vagrant コマンド一覧
※これが全部ではないですが、普段使いそうなものはピックアップしてます。
個別仮想マシン管理(仮想マシン管理フォルダ上で実行するコマンド)
| vagrant init (box名) | 仮想マシンの初期化。(フォルダにVagrantファイルを作成) |
| vagrant up | 仮想マシンの起動。初回は構築(プロビジョニング)も同時に行います。 |
| vagrant halt | 仮想マシンのシャットダウン(終了) |
| vagrant suspend | 仮想マシンのサスペンド(一時停止) |
| vagrant resume | 仮想マシンの復帰。 |
| vagrant reload | 再起動。 halt(シャットダウン) して up(起動) します。 |
| vagrant provision | 仮想マシンが起動した状態で使用。構築をし直します。Vagrant ファイルを修正したときに実行します。 |
| vagrant destroy | 仮想マシンを削除します。vagrant は 簡単に仮想マシンを削除したり 再構築できるのが便利です。 |
| vagrant status | 仮想マシンのステータス(状況)表示。 |
| vagrant ssh | 仮想マシンへログインします。 |
全仮想マシン管理(どのフォルダでも実行できるコマンド)
| vagrant global-status | 仮想マシンの状況表示。ローカルパソコンのvagrantで管理しているすべての仮想マシンが一覧表示されます。 |
| vagrant destroy xxxx |
vagrant global-status で表示されるid を xxxxに指定すると、どのフォルダからでも削除できます。 |
| vagrant plugin list |
インストールされているプラグインの一覧表示。 |
| vagrant version |
vagrant のバージョン表示 |
Box(仮想マシンのベースイメージ)を管理するコマンド
| vagrant box list | Boxの一覧表示。 |
| vagrant box add xx/xx | Boxを追加することができます。このコマンドは使用しなくても、仮想マシンを vagrant up で最初に構築するとき追加されます。 |
| vagrant box remove xx/xx |
Boxの削除 |
vagrant コマンドの動作例
個別仮想マシン管理
vagrant init (box名)
ちなみにbox名を間違っていてもエラーは出ません。
|
1 2 3 4 5 6 |
user@cf-nx2 MINGW64 /c/data/tk/vagrant/manutest $ vagrant init bento/centos-7.5 A `Vagrantfile` has been placed in this directory. You are now ready to `vagrant up` your first virtual environment! Please read the comments in the Vagrantfile as well as documentation on `vagrantup.com` for more information on using Vagrant. |
フォルダに既にVagrantfile がある場合はエラーになります。いったん削除してからinitコマンドを使います。
vagrant up
初回
初回は構築(プロビジョニング)も行います。base box をImporting(輸入・取り込み)していると表示されてますね。
起動まで終わっています。
|
1 2 3 4 5 6 7 8 9 10 11 12 13 14 15 16 17 18 19 20 21 22 23 24 25 26 27 28 29 30 31 32 33 34 35 36 37 38 |
user@cf-nx2 MINGW64 /c/data/tk/vagrant/manutest $ vagrant up Bringing machine 'default' up with 'virtualbox' provider... ==> default: Importing base box 'bento/centos-7.5'... ==> default: Matching MAC address for NAT networking... ==> default: Checking if box 'bento/centos-7.5' is up to date... ==> default: Setting the name of the VM: manutest_default_1548225368674_24309 ==> default: Fixed port collision for 22 => 2222. Now on port 2201. ==> default: Clearing any previously set network interfaces... ==> default: Preparing network interfaces based on configuration... default: Adapter 1: nat ==> default: Forwarding ports... default: 22 (guest) => 2201 (host) (adapter 1) ==> default: Booting VM... ==> default: Waiting for machine to boot. This may take a few minutes... default: SSH address: 127.0.0.1:2201 default: SSH username: vagrant default: SSH auth method: private key default: default: Vagrant insecure key detected. Vagrant will automatically replace default: this with a newly generated keypair for better security. default: default: Inserting generated public key within guest... default: Removing insecure key from the guest if it's present... default: Key inserted! Disconnecting and reconnecting using new SSH key... ==> default: Machine booted and ready! ==> default: Checking for guest additions in VM... default: The guest additions on this VM do not match the installed version of default: VirtualBox! In most cases this is fine, but in rare cases it can default: prevent things such as shared folders from working properly. If you see default: shared folder errors, please make sure the guest additions within the default: virtual machine match the version of VirtualBox you have installed on default: your host and reload your VM. default: default: Guest Additions Version: 5.2.18 default: VirtualBox Version: 6.0 ==> default: Mounting shared folders... default: /vagrant => C:/data/tk/vagrant/manutest |
2回目以降poweroff(停止)時
再構築をせず、起動だけします。
|
1 2 3 4 5 6 7 8 9 10 11 12 13 14 15 16 17 18 19 20 21 22 23 24 25 26 27 28 29 30 31 |
user@cf-nx2 MINGW64 /c/data/tk/vagrant/manutest $ vagrant up Bringing machine 'default' up with 'virtualbox' provider... ==> default: Checking if box 'bento/centos-7.5' is up to date... ==> default: Clearing any previously set forwarded ports... ==> default: Fixed port collision for 22 => 2222. Now on port 2201. ==> default: Clearing any previously set network interfaces... ==> default: Preparing network interfaces based on configuration... default: Adapter 1: nat ==> default: Forwarding ports... default: 22 (guest) => 2201 (host) (adapter 1) ==> default: Booting VM... ==> default: Waiting for machine to boot. This may take a few minutes... default: SSH address: 127.0.0.1:2201 default: SSH username: vagrant default: SSH auth method: private key ==> default: Machine booted and ready! ==> default: Checking for guest additions in VM... default: The guest additions on this VM do not match the installed version of default: VirtualBox! In most cases this is fine, but in rare cases it can default: prevent things such as shared folders from working properly. If you see default: shared folder errors, please make sure the guest additions within the default: virtual machine match the version of VirtualBox you have installed on default: your host and reload your VM. default: default: Guest Additions Version: 5.2.18 default: VirtualBox Version: 6.0 ==> default: Mounting shared folders... default: /vagrant => C:/data/tk/vagrant/manutest ==> default: Machine already provisioned. Run `vagrant provision` or use the `--provision` ==> default: flag to force provisioning. Provisioners marked to run always will still run. |
サスペンド(一時停止)時
普通に復帰します。
|
1 2 3 4 5 6 7 8 9 10 11 12 13 |
user@cf-nx2 MINGW64 /c/data/tk/vagrant/manutest $ vagrant up Bringing machine 'default' up with 'virtualbox' provider... ==> default: Checking if box 'bento/centos-7.5' is up to date... ==> default: Resuming suspended VM... ==> default: Booting VM... ==> default: Waiting for machine to boot. This may take a few minutes... default: SSH address: 127.0.0.1:2201 default: SSH username: vagrant default: SSH auth method: private key ==> default: Machine booted and ready! ==> default: Machine already provisioned. Run `vagrant provision` or use the `--provision` ==> default: flag to force provisioning. Provisioners marked to run always will still run. |
vagrant reload
halt(終了)してup(開始)します。
|
1 2 3 4 5 6 7 8 9 10 11 12 13 14 15 16 17 18 19 20 21 22 23 24 25 26 27 28 29 30 31 32 33 34 35 |
user@cf-nx2 MINGW64 /c/data/tk/vagrant/centos7 $ vagrant reload ==> default: Attempting graceful shutdown of VM... ==> default: Checking if box 'bento/centos-7.5' is up to date... ==> default: Clearing any previously set forwarded ports... ==> default: Clearing any previously set network interfaces... ==> default: Preparing network interfaces based on configuration... default: Adapter 1: nat default: Adapter 2: hostonly ==> default: Forwarding ports... default: 22 (guest) => 2222 (host) (adapter 1) ==> default: Booting VM... ==> default: Waiting for machine to boot. This may take a few minutes... default: SSH address: 127.0.0.1:2222 default: SSH username: vagrant default: SSH auth method: private key default: Warning: Connection reset. Retrying... default: Warning: Remote connection disconnect. Retrying... default: Warning: Connection aborted. Retrying... ==> default: Machine booted and ready! ==> default: Checking for guest additions in VM... default: The guest additions on this VM do not match the installed version of default: VirtualBox! In most cases this is fine, but in rare cases it can default: prevent things such as shared folders from working properly. If you see default: shared folder errors, please make sure the guest additions within the default: virtual machine match the version of VirtualBox you have installed on default: your host and reload your VM. default: default: Guest Additions Version: 5.2.18 default: VirtualBox Version: 6.0 ==> default: Configuring and enabling network interfaces... ==> default: Mounting shared folders... default: /vagrant => C:/data/tk/vagrant/centos7 ==> default: Machine already provisioned. Run `vagrant provision` or use the `--provision` ==> default: flag to force provisioning. Provisioners marked to run always will still run. |
vagrant ssh
ログインします。ログインした先(=仮想マシン上)では、bashというシェルでlinuxのコマンドを使って仮想マシンを操作します。
linuxのコマンドについては、記事「centosでよく使うLinuxコマンド【基礎編】」で紹介しています。
|
1 2 3 4 5 6 7 8 9 10 11 12 13 |
user@cf-nx2 MINGW64 /c/data/tk/vagrant/manutest $ vagrant ssh [vagrant@localhost ~]$ whoami vagrant [vagrant@localhost ~]$ cat /etc/redhat-release CentOS Linux release 7.5.1804 (Core) [vagrant@localhost ~]$ ls -aF ./ ../ .bash_logout .bash_profile .bashrc .ssh/ .vbox_version [vagrant@localhost ~]$ exit logout Connection to 127.0.0.1 closed. user@cf-nx2 MINGW64 /c/data/tk/vagrant/manutest |
vagrant suspend
仮想マシンを一時停止します。
|
1 2 3 |
user@cf-nx2 MINGW64 /c/data/tk/vagrant/manutest $ vagrant suspend ==> default: Saving VM state and suspending execution... |
vagrant status
仮想マシンのステータス(状況)を表示します。
|
1 2 3 4 5 6 7 |
user@cf-nx2 MINGW64 /c/data/tk/vagrant/manutest $ vagrant status Current machine states: default saved (virtualbox) To resume this VM, simply run `vagrant up`. |
saved というのは、 vagrant suspend コマンドで一時停止している状態です。
動作しているときは、「running」 になります。
|
1 2 3 4 5 6 7 8 9 10 |
user@cf-nx2 MINGW64 /c/data/tk/vagrant/manutest $ vagrant status Current machine states: default running (virtualbox) The VM is running. To stop this VM, you can run `vagrant halt` to shut it down forcefully, or you can run `vagrant suspend` to simply suspend the virtual machine. In either case, to restart it again, simply run `vagrant up`. |
停止時はpoweroff と表示されます。
|
1 2 3 4 5 6 7 |
user@cf-nx2 MINGW64 /c/data/tk/vagrant/manutest $ vagrant status Current machine states: default poweroff (virtualbox) The VM is powered off. To restart the VM, simply run `vagrant up` |
vagrant resume
susupendした仮想マシンを復帰させます。このコマンドを覚えてなくても vagrant up でも同様に復帰できます。
|
1 2 3 4 5 6 7 8 9 10 11 |
user@cf-nx2 MINGW64 /c/data/tk/vagrant/manutest $ vagrant resume ==> default: Resuming suspended VM... ==> default: Booting VM... ==> default: Waiting for machine to boot. This may take a few minutes... default: SSH address: 127.0.0.1:2201 default: SSH username: vagrant default: SSH auth method: private key ==> default: Machine booted and ready! ==> default: Machine already provisioned. Run `vagrant provision` or use the `--provision` ==> default: flag to force provisioning. Provisioners marked to run always will still run. |
vagrant provision
仮想マシンの管理ファイル Vagrantfile に provision 項目を記述している場合に、プロビジョニングを実施します。
仮想マシンが動いているとき(runningステータス)だけ、できます。また、初回の vagrant up でも起動した後、プロビジョニングまで行います。
プロビジョニングのテストをします。とはいえ、初期設定というより、画面に文字列を表示する echo コマンドを Vagrantfile に記述して、 vagrant provision を実行してみます。
まず、Vagrantfile をエディタで開いてください。
下図のように、config.vm.provision の行があるので、# をはずして有効にしてください。

最初は、
|
1 2 3 4 5 6 7 8 |
# Enable provisioning with a shell script. Additional provisioners such as # Puppet, Chef, Ansible, Salt, and Docker are also available. Please see the # documentation for more information about their specific syntax and use. # config.vm.provision "shell", inline: <<-SHELL # apt-get update # apt-get install -y apache2 # SHELL end |
のようになっています。# は コメント行の意味で、設定としては意味を持たない行になります。修正により下のリストのようにします。
echo というのは Linuxのコマンドの一つでただ単に画面表示するだけになります。
|
1 2 3 4 5 6 7 |
# Enable provisioning with a shell script. Additional provisioners such as # Puppet, Chef, Ansible, Salt, and Docker are also available. Please see the # documentation for more information about their specific syntax and use. config.vm.provision "shell", inline: <<-SHELL echo "=== Provisioning Test ===" SHELL end |
実行結果:
|
1 2 3 4 5 |
user@cf-nx2 MINGW64 /c/data/tk/vagrant/手動テスト $ vagrant provision ==> default: Running provisioner: shell... default: Running: inline script default: === Provisioning Test === |
ちなみに仮想マシンが動いていないときに行うと、下ログのように、VM(Virtual Machine = 仮想マシン)が動いていませんよと注意され実行されません。
|
1 2 3 |
user@cf-nx2 MINGW64 /c/data/tk/vagrant/手動テスト $ vagrant provision ==> default: VM is not currently running. Please, first bring it up with `vagrant up` then runthis command. |
vagrant destroy
|
1 2 3 4 |
user@cf-nx2 MINGW64 /c/data/tk/vagrant/手動テスト $ vagrant destroy default: Are you sure you want to destroy the 'default' VM? [y/N] y ==> default: Destroying VM and associated drives... |
仮想マシンを削除します。
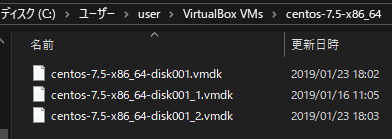
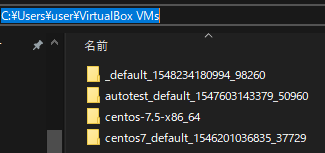
仮想マシンの実体は、
C:\Users\user\VirtualBox VMs
フォルダの下にあります。user はログインユーザ名です。
box と同じ名前のフォルダの下に、そのboxを使用している仮想マシンの数だけ vmdk ファイルができています。

一つ上のフォルダには、管理用のフォルダもできます。vmdkファイルが保存されるcentos-7.5-x86_64 以外の3つのフォルダが 仮想マシン管理フォルダになってます。

destroy すると消えます。
vagrant destroy後のフォルダ
全仮想マシン管理
vagrant global-status
|
1 2 3 4 5 6 7 8 9 10 11 12 13 14 15 16 |
user@cf-nx2 MINGW64 /c/data/tk/vagrant $ vagrant global-status id name provider state directory ------------------------------------------------------------------------- 915e197 default virtualbox running C:/data/tk/vagrant/centos7 b644cec default virtualbox poweroff C:/data/tk/vagrant/autotest d00b683 default virtualbox running C:/data/tk/vagrant/手動テスト 7d8705c default virtualbox running C:/data/tk/vagrant/manutest The above shows information about all known Vagrant environments on this machine. This data is cached and may not be completely up-to-date (use "vagrant global-status --prune" to prune invalid entries). To interact with any of the machines, you can go to that directory and run Vagrant, or you can use the ID directly with Vagrant commands from any directory. For example: "vagrant destroy 1a2b3c4d" |
vagrant destroy xxxx
|
1 2 3 4 |
915e197 default virtualbox running C:/data/tk/vagrant/centos7 b644cec default virtualbox poweroff C:/data/tk/vagrant/autotest d00b683 default virtualbox running C:/data/tk/vagrant/手動テスト 7d8705c default virtualbox running C:/data/tk/vagrant/manutest |
このうち、d00b683 を消してみましょう。
→ 仮想マシンの管理フォルダに日本語名が混じっているとNGでした・・・「UTF-8のバイト並びが無効」とか文字コードが問題っぽいエラーが出てます。
|
1 2 3 4 5 6 7 8 |
user@cf-nx2 MINGW64 /c/data/tk/vagrant $ vagrant destroy d00b683 C:/HashiCorp/Vagrant/embedded/gems/2.2.2/gems/vagrant-2.2.2/lib/vagrant/ui.rb:335:in `split': invalid byte sequence in UTF-8 (ArgumentError) from C:/HashiCorp/Vagrant/embedded/gems/2.2.2/gems/vagrant-2.2.2/lib/vagrant/ui.rb:335:in `format_message' from (eval):9:in `warn' from C:/HashiCorp/Vagrant/embedded/gems/2.2.2/gems/vagrant-2.2.2/lib/vagrant/machine.rb:598:in `check_cwd' from C:/HashiCorp/Vagrant/embedded/gems/2.2.2/gems/vagrant-2.2.2/lib/vagrant/machine.rb:179:in `action' from C:/HashiCorp/Vagrant/embedded/gems/2.2.2/gems/vagrant-2.2.2/lib/vagrant/batch_action.rb:82:in `block (2 levels) in run' |
代わりに管理フォルダが英数文字の 7d8705c の方を削除してみます。こちらは問題なく削除できます。
|
1 2 3 4 5 |
user@cf-nx2 MINGW64 /c/data/tk/vagrant $ vagrant destroy 7d8705c default: Are you sure you want to destroy the 'default' VM? [y/N] y ==> default: Forcing shutdown of VM... ==> default: Destroying VM and associated drives... |
vagrant plugin list
vagrant の機能を拡張するプラグインの一覧表示です。
|
1 2 3 |
user@cf-nx2 MINGW64 /c/data/tk/vagrant $ vagrant plugin list No plugins installed. |
何も入れてないのでこんな表示です ^^;
vagrant version
バージョン表示です。新しいバージョンがリリースされていると教えてくれます。
|
1 2 3 4 5 6 7 8 9 10 11 12 13 14 15 |
user@cf-nx2 MINGW64 /c/data/tk/vagrant $ vagrant version Installed Version: 2.2.2 Latest Version: 2.2.3 To upgrade to the latest version, visit the downloads page and download and install the latest version of Vagrant from the URL below: https://www.vagrantup.com/downloads.html If you're curious what changed in the latest release, view the CHANGELOG below: https://github.com/hashicorp/vagrant/blob/v2.2.3/CHANGELOG.md |
BOX管理コマンド
vagrant box list
|
1 2 3 |
user@cf-nx2 MINGW64 /c/data/tk/vagrant $ vagrant box list bento/centos-7.5 (virtualbox, 201808.24.0) |
vagrant box add xx/xx
chef社の CentOS 6.9 のboxファイルをダウンロードしてみます。途中で仮想マシンを作成するツールを選択します。VirtualBoxを使用しているので、2 を入力しています。
|
1 2 3 4 5 6 7 8 9 10 11 12 13 14 15 16 17 18 |
user@cf-nx2 MINGW64 /c/data/tk/vagrant $ vagrant box add bento/centos-6.9 ==> box: Loading metadata for box 'bento/centos-6.9' box: URL: https://vagrantcloud.com/bento/centos-6.9 This box can work with multiple providers! The providers that it can work with are listed below. Please review the list and choose the provider you will be working with. 1) parallels 2) virtualbox 3) vmware_desktop Enter your choice: 2 ==> box: Adding box 'bento/centos-6.9' (v201806.08.0) for provider: virtualbox box: Downloading: https://vagrantcloud.com/bento/boxes/centos-6.9/versions/201806.08.0/providers/virtualbox.box box: Download redirected to host: vagrantcloud-files-production.s3.amazonaws.com box: ==> box: Successfully added box 'bento/centos-6.9' (v201806.08.0) for 'virtualbox'! |
boxファイルは、「C:\Users\user\.vagrant.d\boxes」 フォルダに保存されます。
user は ホストOSであるWindows10のログインユーザ名です。
ダウンロード前:

ダウンロード後:

bento/centos-6.9 のboxが増えてます。
まとめ
この記事では、vagrant でよく使うコマンドをまとめました。
とりあえず、いざ使おうというときは、ここに挙げたもので十分間に合うはずです。
他にもvagrantにはコマンドがありますが、その都度調べましょう。


コメント